Table of Contents
- Prerequisites
- Design overview and terminology
- Create user email lists first
- Integrate Microsoft Entra ID as an identity provider
- Configure WARP enrollment and login policy
- Install cloudflared connector and add CIDR routes
- Configure device profile split tunnels and DNS behavior
- Create Gateway Network Firewall policies
- Install Cloudflare One Client and validate access
- Troubleshooting and cleanup guidance
Prerequisites
- A Cloudflare Zero Trust team name, for example:
companycloud. This can be created during the Zero Trust setup, even with the free plan. This name must be unique across Cloudflare. Note: the free plan allows up to 50 users. - A server inside the on-prem network to run cloudflared connector, preferably Windows Server 2022 or a supported Linux server.
- Microsoft Entra ID tenant access if you want users to authenticate with Microsoft 365 credentials.
- Internal DNS server details if users need to resolve internal FQDNs such as vcsa.company.com.
- A list of private networks that remote users need to access, for example 10.1.1.0/24, 10.3.1.0/24, 192.168.26.0/24, and 192.168.112.0/24.
- A list of required ports such as TCP 3389 for RDP, TCP 443 for web/vSphere, TCP/UDP 53 for DNS, and any other application-specific ports.
1. Design Overview
The goal is to let remote users connect with the Cloudflare One Client / WARP and access private on-premises servers by IP or internal DNS name without exposing RDP to the Internet. The cool thing about this setup is that it does not require that you have a public static IP.
| Component | Purpose | Used in this guide |
| Cloudflare Tunnel connector | Runs inside the network and gives Cloudflare a path to private subnets. | Installed on an internal server that can reach on-prem, Azure, and branch networks. |
| CIDR routes | Tell Cloudflare which private networks are reachable through the connector. | 10.1.1.0/24, 10.3.1.0/24, 192.168.26.0/24, 192.168.112.0/24, etc. |
| WARP enrollment policy | Controls who is allowed to sign in/enroll the Cloudflare One Client. | Uses Azure AD as identity provider and the IT/ERP email lists. |
| Reusable Components > Lists | Reusable email lists for Gateway/Firewall policies and enrollment policy. | IT and ERP user email lists. |
| Gateway Network Firewall policies | Controls actual private IP/port traffic after WARP is connected. | Allow RDP/HTTPS/DNS to approved networks and block everything else. |
So the path from the remote user PC to the internal servers is like this:
Remote user PC -> Cloudflare One Client / WARP -> Cloudflare Zero Trust -> cloudflared connector -> internal servers
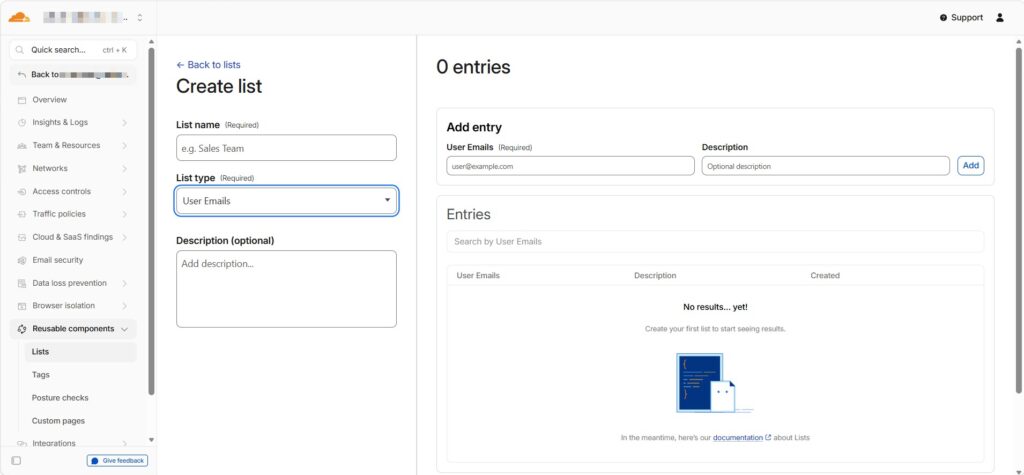
2. Create Reusable Components Lists First
Create user email lists before configuring enrollment and firewall policies. This keeps the design clean because the same lists can be reused in multiple places.
- Open Cloudflare Zero Trust.
- Go to Reusable components > Lists.
- Create a list named IT with type User Emails.
- Add the email addresses of IT users who should access server networks.
- Create a list named ERP with type User Emails.
- Add the users who should access only the ERP/RDP server or the specific server you define.
3. Integrate Microsoft Entra ID / Azure AD as the Identity Provider
Cloudflare One can authenticate users with Microsoft 365 credentials by adding Microsoft Entra ID as an identity provider.
- In Microsoft Entra admin center, create an app registration for Cloudflare Zero Trust.
- Copy the Application (client) ID and Directory (tenant) ID.
- Create a client secret or use the credential method approved in your tenant.
- In Cloudflare Zero Trust, go to Integrations > Identity providers.
- Add Azure AD / Microsoft Entra ID and paste the required values.
- Test the identity provider and confirm the connection works.
4. Configure WARP Enrollment and Login Policy
The WARP Login App controls who can sign in to the Cloudflare One Client. It does not control which internal servers users can access after connecting; that is done later by Gateway Network Firewall policies.
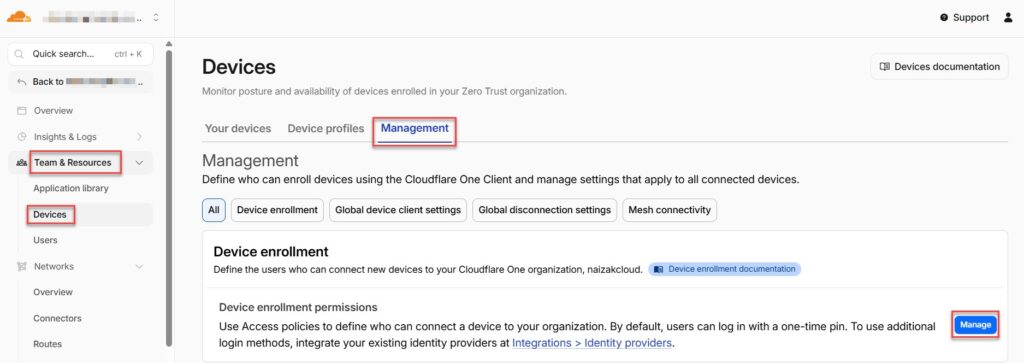
- Go to Team & Resources > Devices > Management > Device enrollment permissions > Manage.
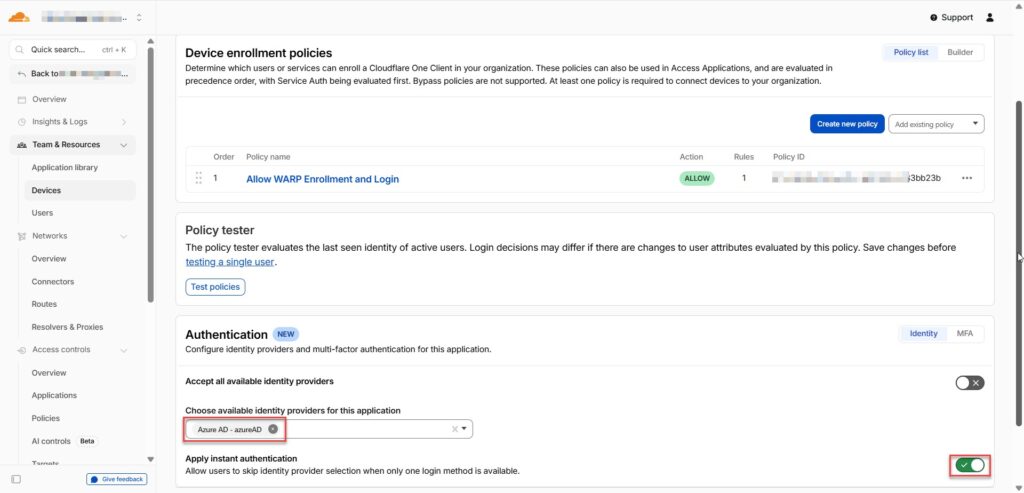
- Create a new enrollment policy.
- Set the policy name to something clear, for example Allow WARP Enrollment and Login.
- Under policy details, set Action to Allow.
- Under policy rules, use Email list and select the IT and ERP reusable lists created earlier.
- Save the policy.
- Under Authentication, select Azure AD as the available identity provider.
- Disable “Accept all available identity providers” if you want only Azure AD to be used.
- Save the policy.

| Important: The WARP Login App is the front door into WARP. A user may be allowed to enroll/connect to WARP but still be blocked from servers if the Gateway Network Firewall policies do not allow the required destination, port, protocol, and identity list. |
5. Install the Cloudflare Tunnel Connector
Install cloudflared on a server that can reach the internal networks. The connector is the private-network bridge between Cloudflare and your on-premises/branch/Azure routes.
- Go to Networks > Connectors.
- Create a new Cloudflare Tunnel.
- Choose Cloudflared and give it a name, the click Save tunnel.
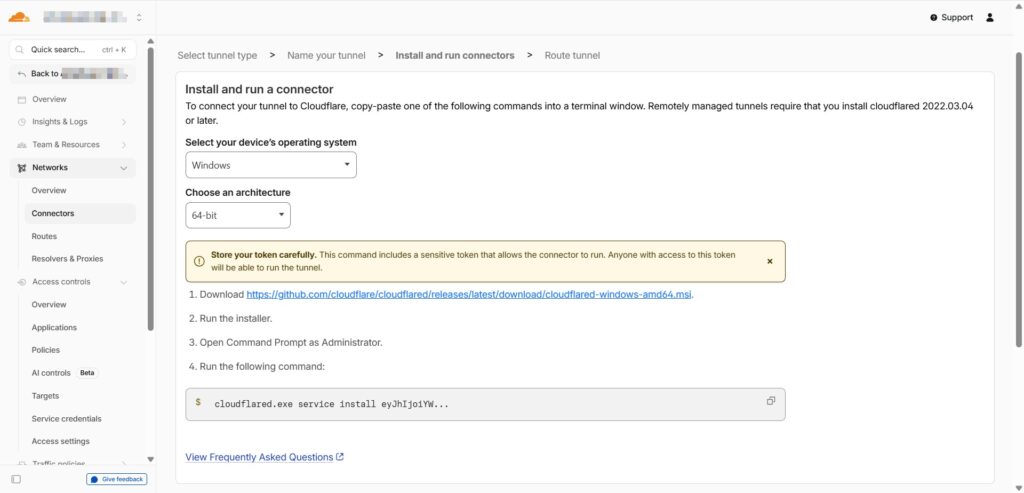
- Choose the operating system where the connector will run.
- Copy the installation command generated by Cloudflare.
- Run the command on the connector server as Administrator.
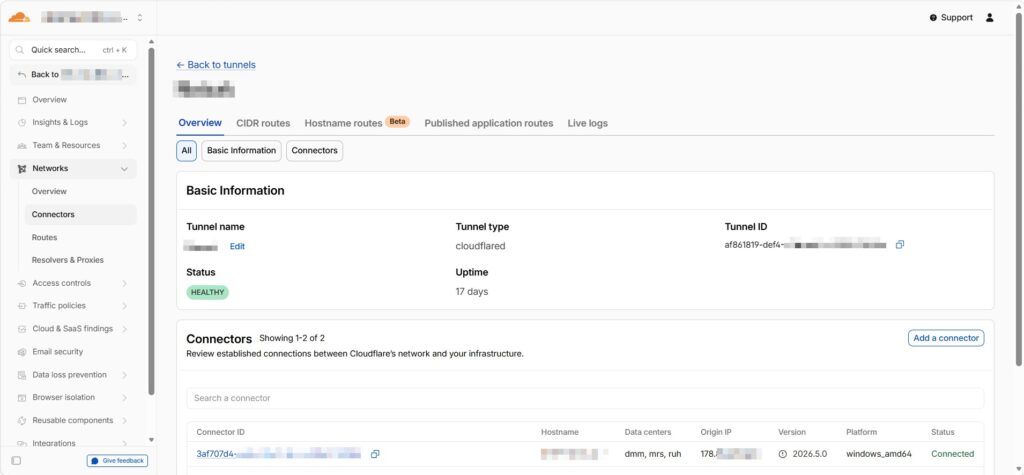
- Confirm the connector shows Healthy / Connected in Cloudflare Zero Trust.
- You can check the status of Cloudflared using these commands:
Get-Service cloudflared
sc.exe query cloudflared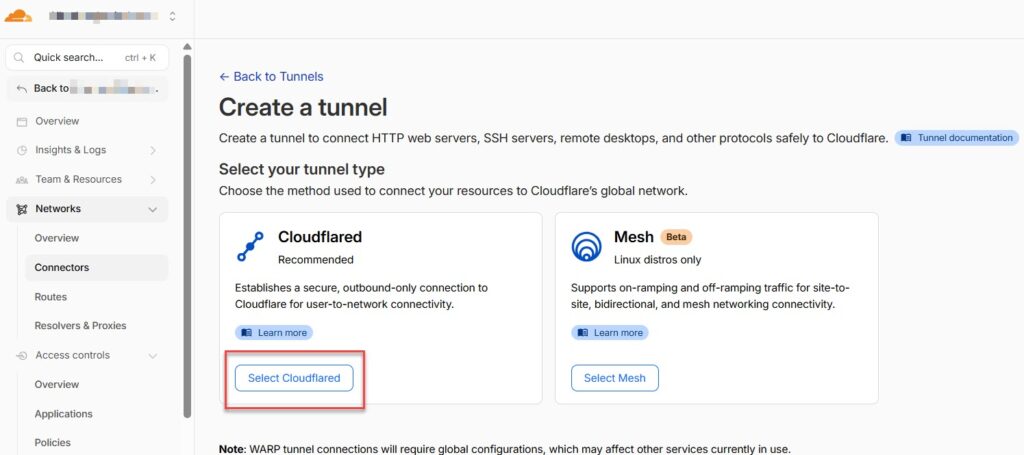
6. Add CIDR Routes for Private Networks
CIDR routes tell Cloudflare how to reach a subnet. They do not grant access by themselves. Firewall policies are still required to decide who can use those routes.
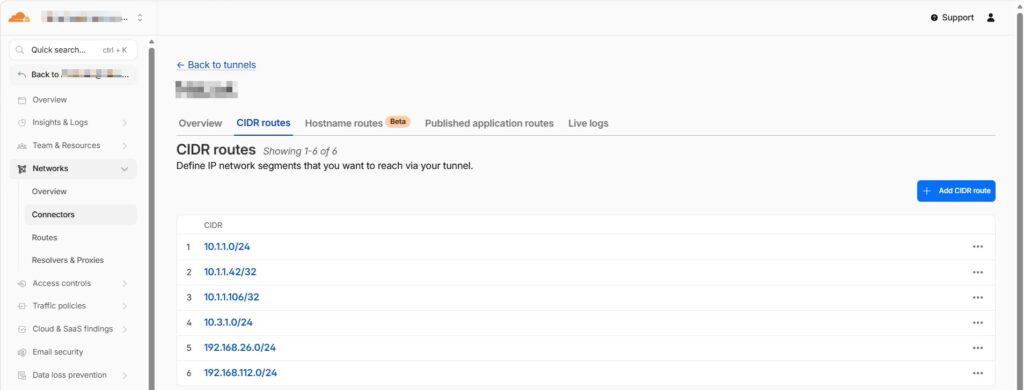
- Go to Networks > Routes.
- Open the CIDR tab.
- Click Add CIDR route.
- Add each network that remote users need to access through the connector.
- Use descriptions that clearly identify each location or server. Examples:
| CIDR route | Description |
| 10.1.1.0/24 | On-prem servers |
| 10.1.1.106/32 | Specific server such as your ERP server |
| 10.1.1.42/32 | Another server, i.e. the attendance server |
| 10.3.1.0/24 | Azure servers |
| 192.168.26.0/24 | Branch 1 |
| 192.168.112.0/24 | Branch 2 |
| Important: If the connector server cannot reach a subnet, WARP clients will not reach it either. Test from the connector server using ping, Test-NetConnection, or the relevant application port. |
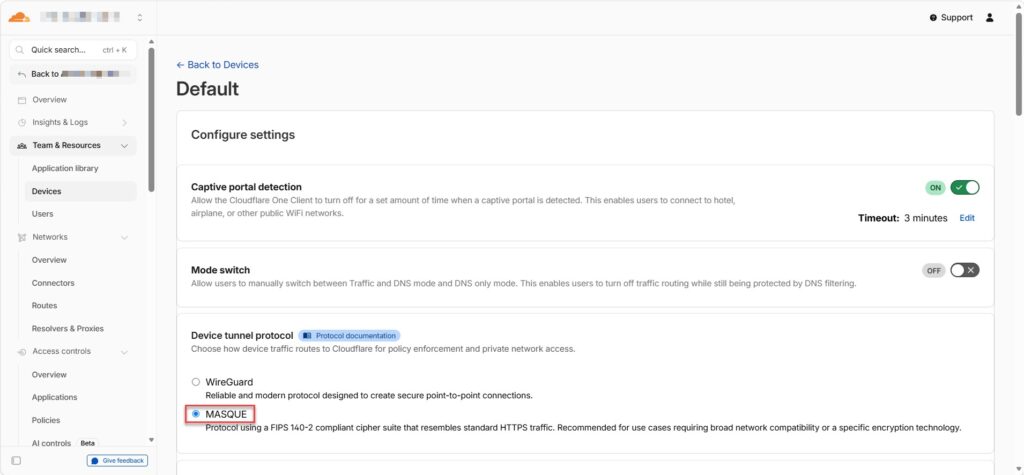
7. Configure the Device Profile
Device profile settings control how the WARP client routes traffic. In this deployment, Split Tunnels use Exclude mode: traffic goes through WARP unless the destination is explicitly excluded.
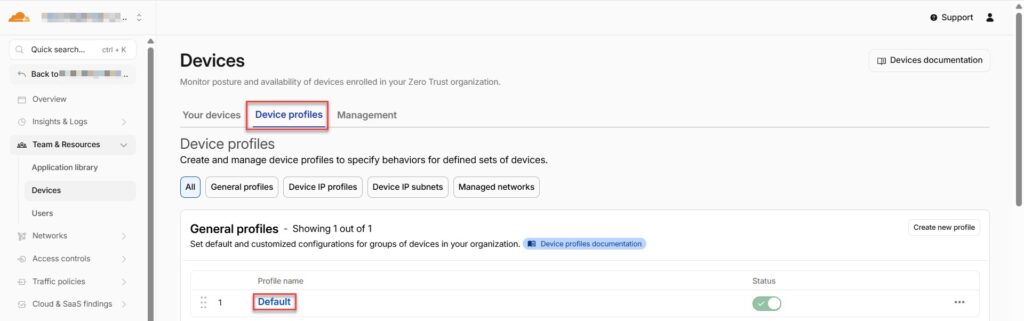
- Go to Team & Resources > Devices > Device profiles.
- Edit the Default profile or create a dedicated profile for your users.
- Under Device tunnel protocol, select MASQUE.
- Under Split Tunnels, use Exclude IPs and domains.
- Do not exclude company networks that should route through Cloudflare. Meaning, if you see i.e. 10.0.0.0/8, or 192.168.0.0/16, or 10.1.1.0/24, just delete them.
- Exclude only real local/home networks that must stay local.
| Do this | Avoid this |
| Exclude only real local networks such as 192.168.100.0/24, 192.168.68.0/24, or 10.1.11.0/24 if needed. | Do not leave broad exclusions like 192.168.0.0/16 if the company uses 192.168.112.0/24 or 192.168.26.0/24. |
| Keep company networks outside the exclusion list so WARP sends them to Cloudflare. | Do not exclude 10.1.1.0/24, 10.3.1.0/24, 192.168.26.0/24, or 192.168.112.0/24 if they should be reached through WARP. |
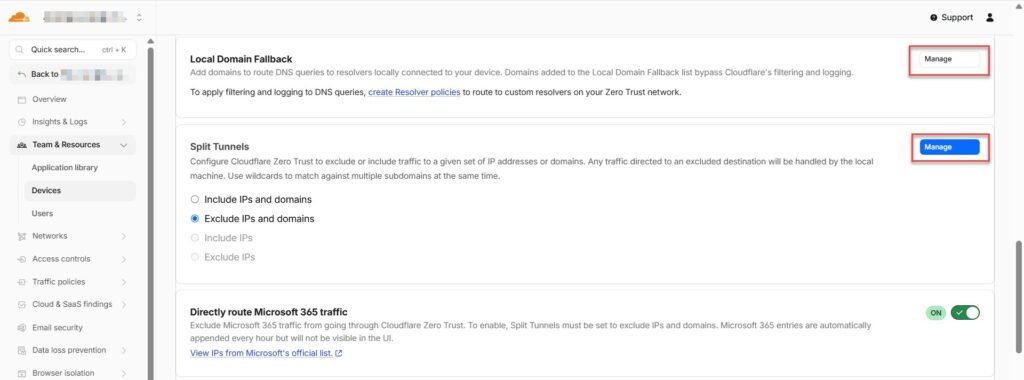
7.1 Local Domain Fallback for Internal DNS
If internal applications redirect to internal FQDNs, configure Local Domain Fallback so WARP asks your internal DNS server for those names. Please see the above screenshot.
For example, Domain: company.com (your Active Directory domain name)
Resolver: 10.1.1.55 (your domain controller)
| Important: Also allow DNS traffic to the DNS server in your Network Firewall policies: for example UDP 53 and TCP 53 to domain controller 10.1.1.55. |
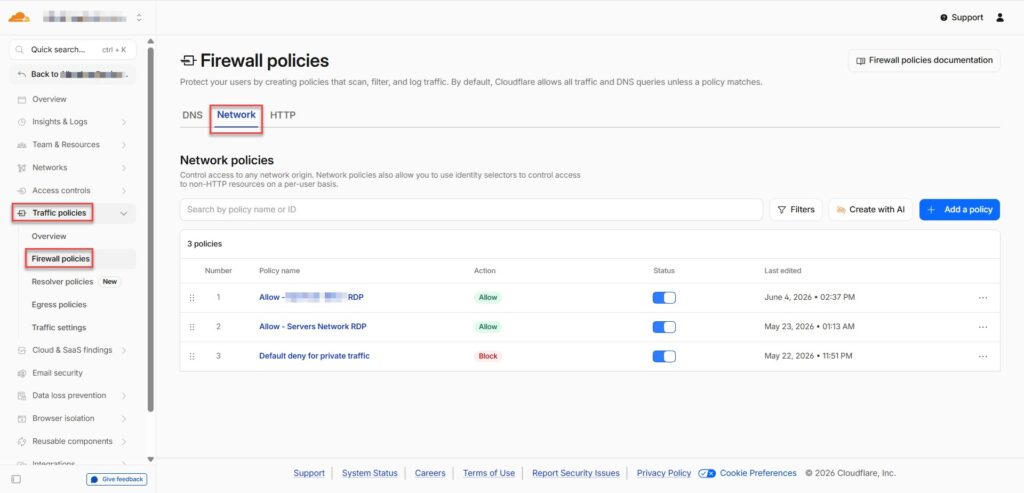
8. Create Gateway Network Firewall Policies
Gateway Network Firewall policies are the real access-control layer for direct WARP access to private IPs. They control destination IP/CIDR, port, protocol, and identity.
8.1 Recommended Policy Order
| Order | Policy | Purpose | Identity |
| 1 | Allow – ERPServer RDP | Allow ERP and IT users to access the specific server 10.1.1.106 on RDP. | User Email in list ERP AND/OR IT |
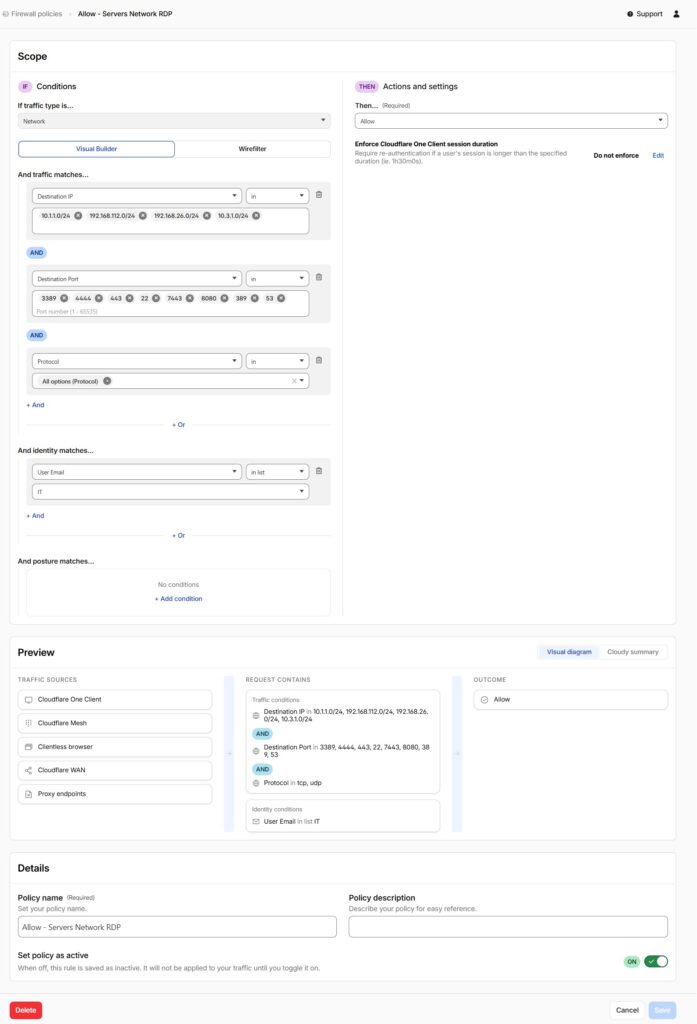
| 2 | Allow – Servers Network RDP | Allow IT users to access approved networks and ports. | User Email in list IT |
| 3 | Default deny for private traffic | Block everything else to private networks after the allow rules. | No identity condition / everyone |
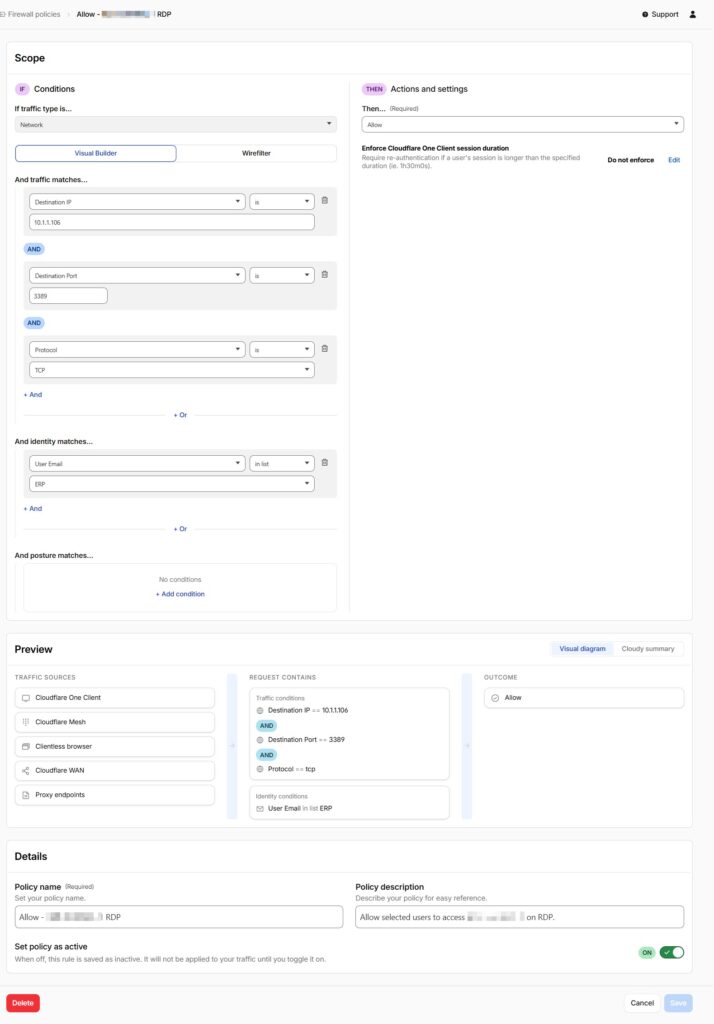
8.2 Configure the allow policy
- Go to Traffic Policies > Firewall policies > Network.
- Create a new Network policy.
- Under traffic matches, add Destination IP or CIDR.
- Add Destination Port values such as 3389 for RDP and 443 for HTTPS/vSphere.
- Set Protocol to TCP, UDP, or All options depending on the service.
- Under identity matches, use User Email > in list > IT or ERP.
- Set action to Allow and save the policy.
8.3 Policy 1: Allow ERP and IT to One Specific Server
Traffic type: Network
Destination IP: 10.1.1.106
Destination Port: 3389
Protocol: TCP
Identity: User Email in list ERP OR User Email in list IT
Action: Allow
8.4 Policy 2: Allow IT to Approved Server Networks
Traffic type: Network
Destination IP in: 10.1.1.0/24, 10.3.1.0/24, 192.168.26.0/24, 192.168.112.0/24
Destination Port in: 3389, 443, 22, 53, and other approved ports
Protocol: TCP/UDP as required
Identity: User Email in list IT
Action: Allow
8.5 Policy 3: Default Deny
Destination IP in: private networks
Action: Block
Place this policy below all allow policies.
| Important: Policy order matters. A broad allow policy without an identity condition can accidentally allow more access than intended. Keep the default deny enabled, but ensure required allow rules are above it. |
9. Download and Install the Cloudflare One Client for Users
- Download the Cloudflare One Client for Windows from Cloudflare.
- Install it on the remote user device.
- Open the client and enter the team name, for example
companycloud. This name can be found under Settings. - Authenticate using Microsoft 365 / Microsoft Entra ID.
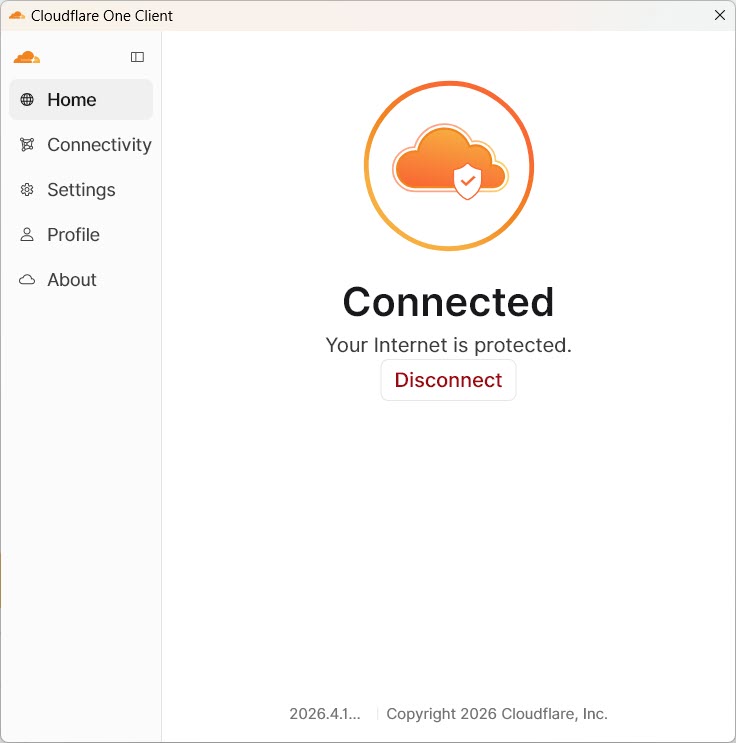
- Confirm the client shows Connected.
- You can use these commands to test the connection:
Test-NetConnection 10.1.1.106 -Port 3389
route print -4 | findstr /i "10.1.1 10.3.1 192.168 Cloudflare"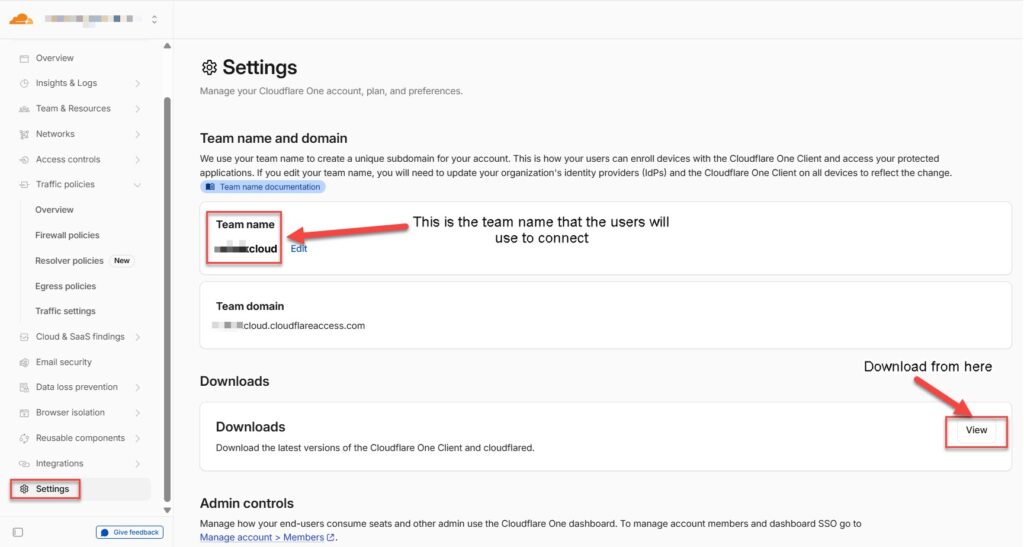
10. Accessing vSphere or Internal Web Consoles
For vCenter/vSphere, avoid opening vCenter by IP. vCenter often redirects to its configured FQDN, for example vcsa.company.com. If internal DNS is not configured through WARP, the redirect will fail.
- Allow TCP 443 to the vCenter IP in Network Firewall policies.
- Configure Local Domain Fallback for the internal DNS zone, for example company.com.
- Allow DNS to the internal DNS server on UDP/TCP 53.
- Open vCenter by FQDN, for example https://vcsa.company.com.
- Check connectivity with these commands:
nslookup vcsa.company.com
Test-NetConnection vcsa.company.com -Port 443
11. Troubleshooting
| Symptom | Likely cause | Check / Fix |
| WARP connected but RDP fails | Firewall policy does not match or server rejects the session. | Run Test-NetConnection to TCP 3389 and check Network logs. |
| Traffic goes through Ethernet instead of CloudflareWARP | Split Tunnel exclusion or local route is taking priority. | Remove broad exclusions and keep company networks out of the exclusion list. |
| 192.168.x.x branch networks do not work | Default 192.168.0.0/16 exclusion includes those company networks. | Remove 192.168.0.0/16 and add back only true local/home networks. |
| Network logs show Default deny | Allow rule did not match. | Check policy order, destination IP/CIDR, port, protocol, and email list membership. |
| vSphere opens by IP then fails after Launch vSphere Client | vCenter redirects to internal FQDN that does not resolve. | Configure Local Domain Fallback and allow DNS to internal DNS servers. |
12. Clarifying Similar Cloudflare Sections
| Cloudflare section | What it does | Use it for this deployment? |
| Networks > Routes | Defines which private CIDR ranges Cloudflare can reach through the connector. | Yes. Required. |
| Traffic Policies > Firewall policies > Network | Controls actual WARP traffic to private IPs and ports. | Yes. Required. |
| Reusable components > Lists | Reusable email/IP/domain lists used by Gateway and Access policies. | Yes. Use IT and ERP email lists. |
| Access controls > Applications | Publishes Access applications such as web apps or browser-rendered infrastructure apps. | Not required for direct WARP private-IP access. |
| Access controls > Policies > Reusable policies | Reusable login policies for Access applications and WARP Login App. | Useful only for WARP enrollment/login unless you publish Access apps. |
| Access controls > Policies > Rule groups | Reusable groups for Access application policies. | Not needed for the Gateway Network Firewall design. |
| Access controls > Targets | Targets for Access infrastructure applications. | Not needed unless you build Access infrastructure apps. |
13. Final Validation Checklist
- Microsoft Entra ID identity provider is configured and tested.
- IT and ERP user email lists are created under Reusable components > Lists.
- WARP enrollment policy allows the correct email lists and uses Azure AD as the identity provider.
- cloudflared connector is connected and can reach each private subnet.
- CIDR routes exist for all private networks that users need to access.
- Split Tunnels do not exclude company networks by mistake.
- Local Domain Fallback is configured for internal DNS zones if FQDN access is needed.
- Network Firewall policies allow only required destinations, ports, protocols, and user lists.
- Default deny is enabled and below all allow policies.
- Cloudflare One Client shows Connected and Test-NetConnection succeeds through CloudflareWARP.
With this structure, Cloudflare routes provide reachability, WARP enrollment controls who can connect to the client, reusable lists simplify user management, and Network Firewall policies enforce exactly which internal servers and ports each user can access.